Monday, October 8, 2012

[brekky bars & chocolate hedgehogs]


I have a new ‘toy’ in the kitchen. A Tupperware ‘T-Bar’ set, which is basically a mould for home-made muesli bars. I've been experimenting with the recipes in the book that comes with it ... and the result must have turned out OK, because the bars I made last Saturday have been eaten already!


BREKKY BARS

3 vita-brit bars
1/4 cup rolled oats
1/4 cup rice bubbles
2 tbs LSA (Linseed, Sunflower & Almond Meal)*
40g butter
2 tbs golden syrup

Method:
Break up the vita-brits and mix with rolled oats, rice bubbles and LSA.
Melt the butter and syrup together and then combine with the dry ingredients.
Press into the mould and set for one hour in the fridge.

*You could always use some other crushed nuts instead.

I've been having a Brekky Bar broken up in a plate with vanilla yoghurt for breakfast - YUM!


CHOCOLATE HEDGEHOGS

100g granita biscuits
1/4 cup (45g) almonds*
180g milk or dark chocolate
40g butter
2 tbs golden syrup

Method:
Put the biscuits and almonds into a sandwich bag and then crush with a mallet (I use a meat tenderiser).
Melt the chocolate, butter and syrup together and then combine with the dry ingredients.
Press into the mould and set for one hour in the fridge.

I recommend cutting these bars into 3 pieces - they're a bit rich to have an entire bar in one sitting - plus it makes them last a few days longer before you have to make more! Great morning tea snack for the kid's lunchboxes, or with a cuppa at home. I think next time I make these I won't crush the biscuit up as finely as I have so far, then these hedgehogs should be even more ‘fudgier’.  :)

*I replaced the almonds for cashews the first time I made it, and also added a couple of tbs of diced tinned raspberries.


[cool 'Ness]


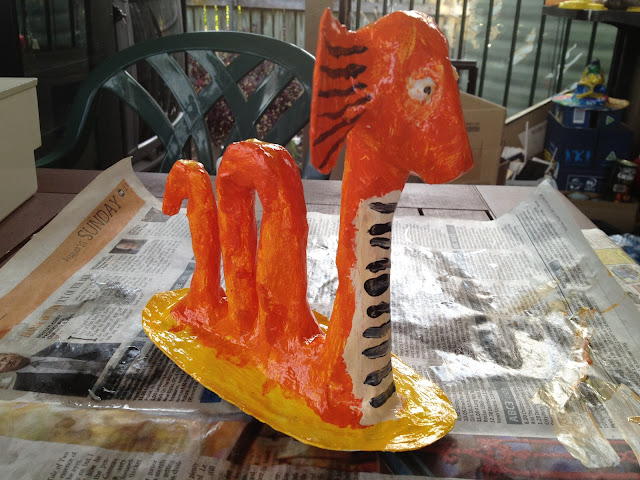
My youngest son has done a sculpture for the local Youth Art Awards next week. He made a foil structure in the basic shape (you can see his mini-prototype in the background of the photo above), and then put papier machĂ© over the top. Once it was dry, he painted a layer of undercoat and then did the final paint job. 

It's called ‘Trashy the Seamonster’, not ‘Nessie’, which would be kinda cool.


Sunday, October 7, 2012

[arty blog catchup]

Been very slack in the blogging world the past month ... too busy to stop and share all the amazing projects I've been working on ... not to mention packing for and going on a week's holiday on our little speedboat in Southern Moreton Bay. The weather was just perfect and I so wish I was still sitting bobbing in the ocean. But alas, reality has returned with a resounding ‘Thump!’

Just a quick photo catchup on what arty activities I've been up to these past few weeks...


Stage Prop for my son's Year 7 classes ‘SalvagĂ©’ Recycled Fashion Parade performance: 
(I made the prop, but the kids did the painting under my supervision. Turned out so much better than I was expecting, and the smoke machine on stage looked fab.)


A 40th Birthday Card/Frame (with quilling embellishments): 


A Quilled 50th Birthday Card/Frame: 


...and opening night of my first group exhibition ‘Dare to Do Square’ at the Pine Rivers Regional Art Gallery at Strathpine in Brisbane: 


Above: My piece ‘The Meeting Place’. The exhibition is on display until 3 November 2012.


Monday, September 3, 2012

[happy father's day ... for yesterday]

It's been a little while since posts, as I've been so busy with deadlines, but thought I'd share this father's day project we've done with the Grade 2s these past two weeks.


This 'World's Greatest Dad' Trophy was filled with chocky's for Dad. I was inspired by this site for the concept, but I made a few modifications (to save drying time for paint) by making a pre-fabricated flat pack that the kids could cut out and assemble. (The experience of a graphic designer's packaging skills come in handy some time!)


I found an image of marble and then made a mock brass trophy plate for the front.


I love this box design, no pesky glue required! 
Printed on light (200gsm) card, it's strong enough to fold and join really well.

 
Cut out and folded like this... assembled like that with the 'flaps' tucked in...

and then sticky-taped closed.

 
A couple of foam cups were glued together, and then 'sponged' with gold paint (we used paper towel for this process ... less cleaning up this way as we could just throw the dirty paper towel away!) 


Then we glued the pipe cleaner 'handles' on. They were approximately 10cm long, so we could get three pieces per pipe cleaner. Don't forget to sponge some gold into the 'top' of the trophy to finish the edge, so you don't see any white when you've got it filled with goodies.


How did you spend your father's day? 

 My boys and I took a little trip on the City Cat ferry from Hamilton to Southbank, and then a ride on 'The Wheel of Brisbane' for Dad's day. Was a gorgeous spring day to be out and about!


Sunday, August 5, 2012

[dancing at the Show]

Got to dance again with all the divas and the kids last night at the Pine Rivers Show. We had a great time!

Getting my 'GAGA' on, to 'Edge of Glory'


Cheer dance

Finale - I'm in the very back row on the left

Thursday, August 2, 2012

[spoiled by Mum]

My Mum came to visit yesterday and brought with her my birthday present. Now, most daughters would be excited by jewellery or clothing presents from their Mum, but I'm a bit different, I was really excited to get a tool box!! 


With the little removable dividers, it's just the perfect size to fit my quilling papers, tools, glues as well as any made flowers or scrolls ... and it's double-sided so there's a whole other side to fill up with goodies too. Happy days. :)


Wednesday, August 1, 2012

[bottlebrush quilling]

I'm loving my new papercraft of quilling. Our local Agricultural Show is on this weekend, and I whipped up this little project in a hurry last Saturday night as it had to be delivered on the Sunday!  Ahhh, deadlines, don't you love them? I really don't think I'd ever get anything done without them.  Anyway, here's the photo gallery of my little native flower project...

Making the components (note: there are a few 'ring-ins' here –
I didn't use all the pieces shown here to make the final artwork.)

The red strip of paper with the thin edge of yellow (above right) is what I used to roll up to make the flowers. Each rolled fringed flower was then glued to a light green seed cup, and then a thin strip of darker green was glued around the base. You'll also notice that there are little tiny pieces of yellow paper on the green cut mat; some of yellow strip fell off as I cut the fringing (as it mustn't have been glued properly), but this was actually a good thing, as it meant I didn't have a yellow tip on every end, so it was more 'natural'. 

I drew the leaf shapes onto an old envelope that was a lovely textured and speckled gum leaf green colour and then scored the vein down the centre using my scoring bone. I'm pretty sure the one I have is actually plastic, not bone – it was given to me by a paper merchant as a gift many years ago and is perfect for scoring paper to make it easier to fold, or in this case, to add impressions onto the paper. The final texture and colour on the leaves were created using colour pencils and then they were cut out and shaped by running through my fingers to get the leaf to curl in the right direction.

My scoring bone.

Working out the layout of the pieces before gluing
(and spreading the flowers petals out).

Detail of the glued and assembled components.

The finished piece with paper frame on a display stand.